Wwise/Unity – Volume Sliders & Saving Volume Settings
In this guide, we will look at how to set up a Wwise Project with different volume buses and save user data using Player Preferences in Unity. This method uses Object Oriented Design principles to create a system which is easily expandable and can work for multiple projects.
Intermediate – This guide expects some basic knowledge of Unity, C# & Wwise.
Short – This is a short guide, it should take about 15-20 minutes.
Requirements – You will need a Wwise Project which is integrated to Unity.
Wwise Project Setup
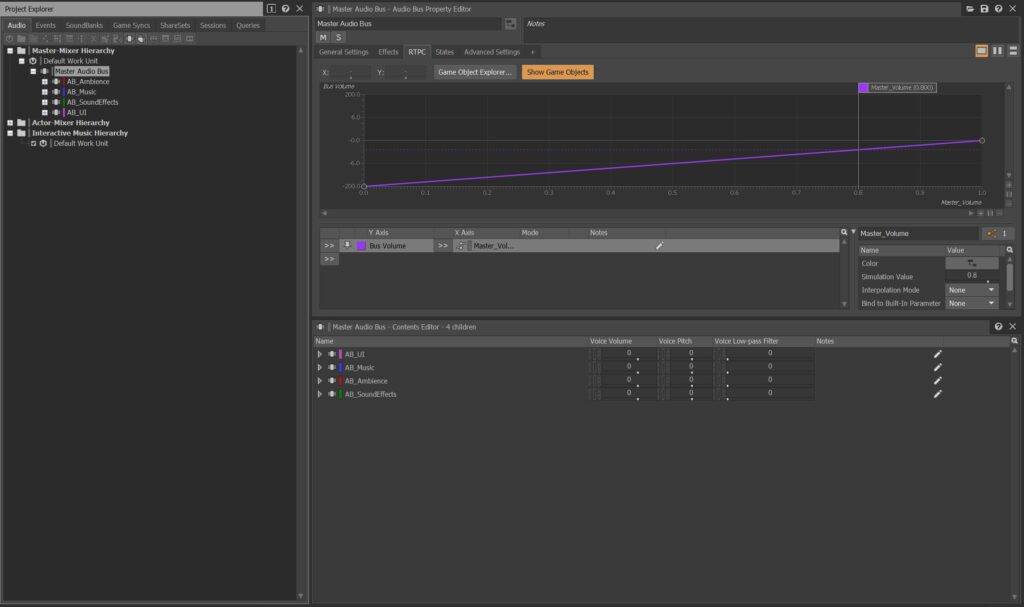
Start by creating a Master bus and several child buses for each specific volume setting, such as Sound Effects, Ambience, UI, etc. generally I like to create new parent buses so your mix is not altered by the user.
Make sure to name your buses in a way that is easier to reference later. I like to use a Prefix such as “AB” (Audio Bus) for my buses followed by an underscore. For example, a master bus would be called “AB_MasterBus”.

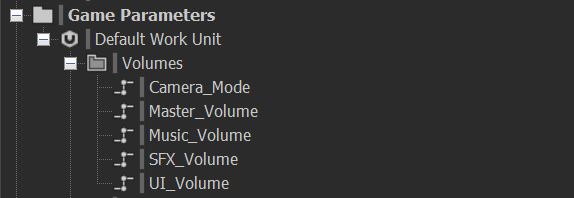
You will also need to create an RTPC for each bus, this is how we will change the the output volume of our buses. I usually use a values between 0-1 for these types of RTPC’s.
Remember to name them based on what bus they control so it easier to reference later. For example, for a master bus I would name it “Master_Volume”.

Now we can automate the output volume of each bus based on the value of their respective RTPC. I usually use 0.8 as the default volume so users can increase the volume for accessibility, you may also want to do this.

Unity Project Setup
In most of my projects, I have an “AudioManager” object which is a child of the “GameManager”, this object would normally handle all audio related settings, control how the music functions and may have additional functionality depending on what type of game it is.
The parent object can be a singleton so it exists in every scene in the game. This object should also exist when starting a scene to set the volume settings accordingly.

Now we want to create our audio settings sliders. You would want to make them a child of an object where we can place a script to handle their logic.
Name your sliders appropriately. For example, a slider which would handle the master volume can be called “MasterVolumeSlider”.
They should be within the hierarchy of a Canvas Object since they inherit from UI.Selectable.

Scripting (The Fast Object Oriented Way!)
This system uses a class to hold all relevant variables for each volume setting, its easily more expandable, however it will require a separate component to load the volumes when a scene starts.
using System;
using System.Collections.Generic;
using UnityEngine;
using UnityEngine.UI;
namespace Audio
{
    //Serializable creates a class which we can edit in the inspector
    [Serializable]
    public class WwiseBus
    {
        //reference to our slider
        public Slider _slider;
        //and our RTPC as a string
        public string _rtpcName;
        //we need to add a listener to set and save the value when it is changed
        public void AddListener()
        {
            _slider.onValueChanged.AddListener(delegate
            {
                AkSoundEngine.SetRTPCValue(_rtpcName, _slider.value);
                SaveVolume(_slider.value);
            });
        }
        //this loads all the volues and if the key does not exist, set the initial volume as 0.8
        public void LoadVolume()
        {
            if (!PlayerPrefs.HasKey(_rtpcName))
                PlayerPrefs.SetFloat(_rtpcName, 0.8f);

            _slider.value = PlayerPrefs.GetFloat(_rtpcName);
        }
        //remove the listener when it is no longer needed
        public void RemoveListener()
        {
            _slider.onValueChanged.RemoveAllListeners();
        }
        //save the volume
        private void SaveVolume(float value)
        {
            PlayerPrefs.SetFloat(_rtpcName, value);
        }
        //and finally delete the key, for debugging or resetting the user data
        public void DeleteData()
        {
            PlayerPrefs.DeleteKey(_rtpcName);
        }
    }
    public class ClassStyleSettings : MonoBehaviour
    {
        //we can now create a list of our brand new WwiseBus classes
        public List <WwiseBus> buses;

        //when this object is enabled, it loads the volumes and adds the listener
        private void OnEnable()
        {
            foreach (var bus in buses)
            {
                bus.LoadVolume();
                bus.AddListener();
            }
        }
        //when this object it disabled, it removes the listener
        private void OnDisable()
        {
            foreach (var bus in buses)
            {
                bus.RemoveListener();
            }
        }
        //and finally a method we can call to remove all the user data!
        public void DeleteUserData()
        {
            foreach (var bus in buses)
            {
                bus.DeleteData();
                bus.LoadVolume();
            }
        }
    }
}
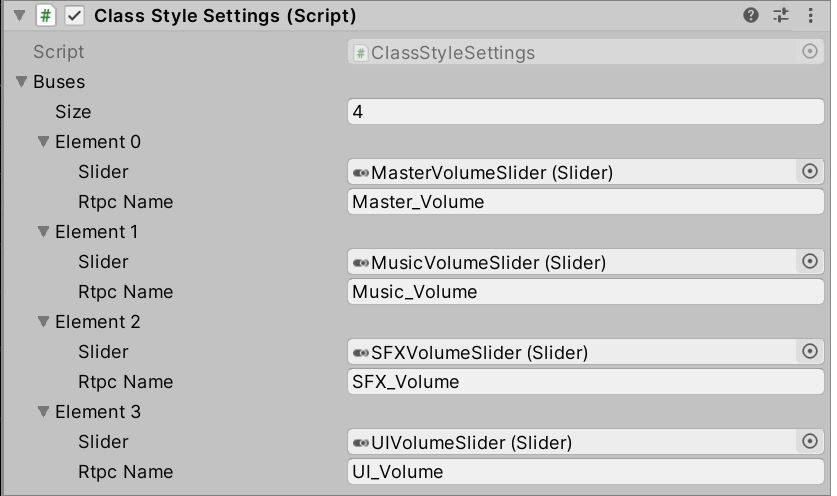
This is designed to used via the inspector, you can easily drag and drop your sliders in here and add the RTPC names as strings! You can also easily expand the system to handle more sliders and RTPC’s.

However this also requires another so the volumes are loaded when a scene is started. This script can be placed on an “AudioManager” type object.
using UnityEngine;
using UnityEngine.Serialization;
namespace Audio
{
    public class SettingsBehaviour : MonoBehaviour
    {
        //we need an array that contains our RTPC names to get our player preferences
        public string[] playerPrefsNames;
        //this is so the method is run as soon as the scene starts
        private void Start()
        {
            LoadPlayerPrefs();
        }

        //this method simple loads the player preferences based on the name
        private void LoadPlayerPrefs()
        {
            foreach (var pref in playerPrefsNames)
            {
                if(PlayerPrefs.HasKey(pref))
                    AkSoundEngine.SetRTPCValue(pref, PlayerPrefs.GetFloat(pref));
                else
                {
                    //if the key does not exist, set it to 0.8 and save it
                    PlayerPrefs.SetFloat(pref, 0.8f);
                    AkSoundEngine.SetRTPCValue(pref, 0.8f);
                }
            }
        }
    }
}

And just like that we have a flexible class based system which saves the players volume settings, can be expanded easily and can be edited by other colleagues inside Unity!
If you would like to see an example of this system in action, click here!